The story in brief
Learn why AI generated film locations change between shots and how to fix architecture, props, lighting, weather, geography, scale, and continuity problems.
Inside this story
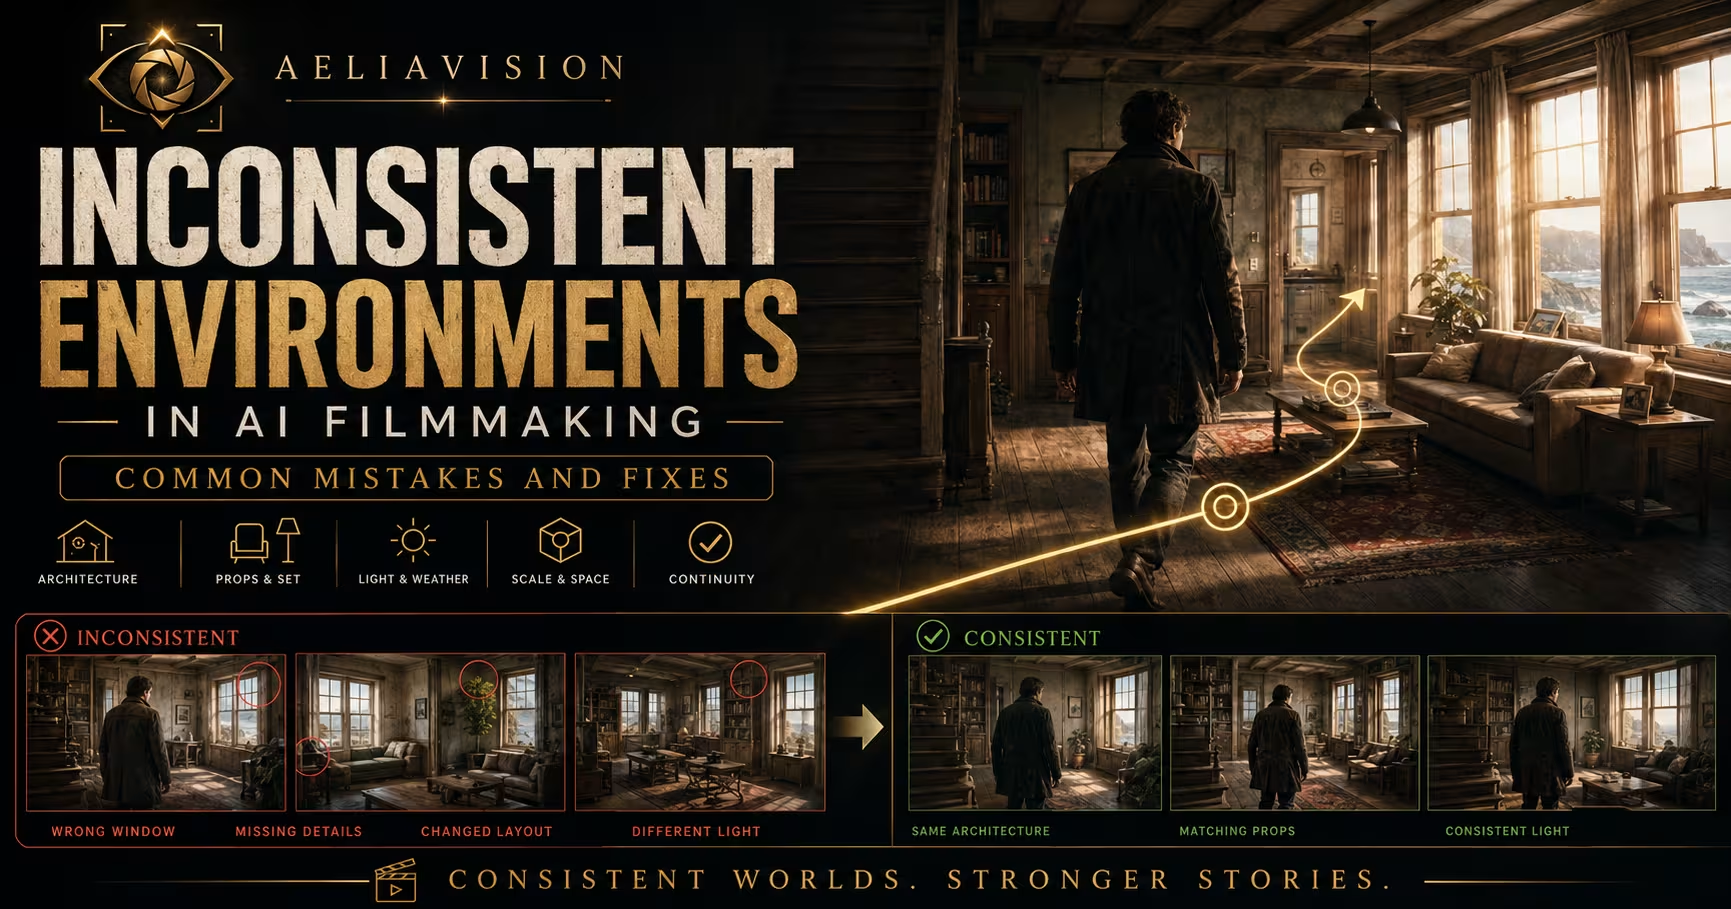
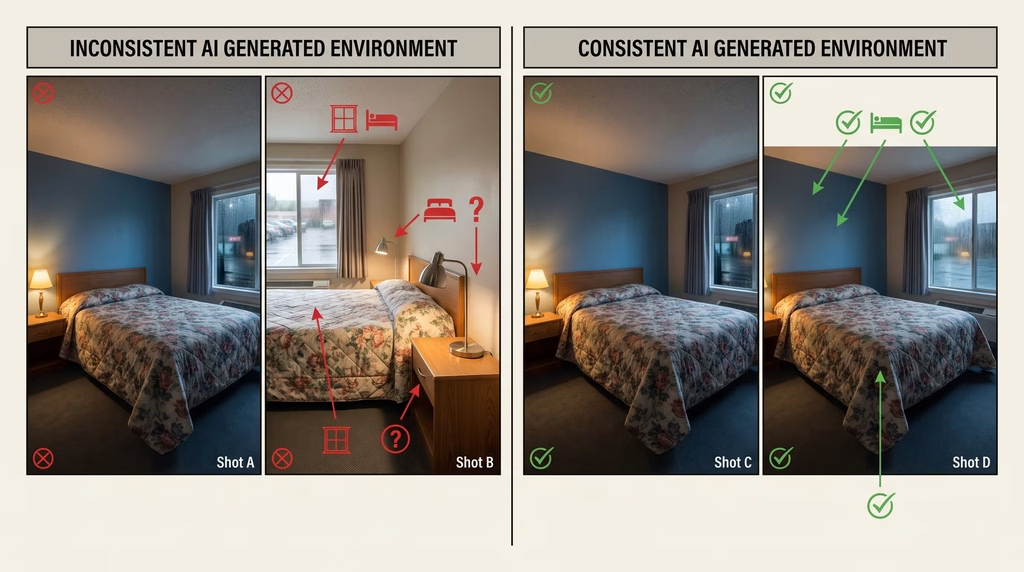
A character can stay recognizable while the world around them quietly changes. The hallway gains a window. The staircase loses three steps. A kitchen island moves closer to the refrigerator. In one shot, rain runs down the outside of the glass. In the reverse, the same window opens onto a dry street beneath a clear sky. Nothing in the dialogue explains the change, yet the audience feels it immediately.
This is an inconsistent environment. It happens when an AI generated film fails to preserve the physical rules of a location from one shot to the next. The architecture, furniture, props, scale, lighting, weather, time of day, surface condition, or spatial relationship may shift. Sometimes the change is dramatic. More often it is small enough to pass on its own and obvious when two shots are cut together.
AI models do not usually maintain a complete 3D location with a persistent floor plan, object inventory, sun position, and history of changes. They infer a plausible environment from the current prompt and reference material. When the prompt says “old coastal house,” the system can invent many different old coastal houses. When it says “the same room,” that phrase may have less practical force than the detailed visual cues surrounding it.
The fix is not to repeat “same location” more often. The fix is to give the location an identity, establish its physical rules, generate shots from stable references, and check every cut for changes that the story has not authorized. This guide explains how to do that in a practical AI filmmaking workflow.
What environment consistency really includes
A location is not just its walls. It is a set of connected visual facts. If you preserve only the broad style, the scene can still fail continuity.
Architecture and fixed geometry
Architecture includes the room shape, doors, windows, stairs, columns, ceiling height, floor level, wall openings, built-in shelves, and the direction of major surfaces. These are the least negotiable parts of a location. A door cannot move from the north wall to the east wall between a wide shot and a close-up unless the camera has crossed the room or the film has established a different space.
Small architectural features matter because they act as landmarks. A crack above a doorway, a green tile strip, a low beam, or a missing pane of glass can help the viewer understand where the camera is. If those landmarks disappear, screen geography becomes vague. The audience may not consciously remember the crack, but they lose confidence in the space.
Furniture and movable set dressing
Tables, chairs, beds, cabinets, rugs, curtains, plants, and boxes define how a character moves through the location. A chair that blocks a path in one shot should not vanish when the actor walks through that path. A rug can establish the center of a room. A sofa can tell us which direction the character is facing in a reverse angle.
AI generators are especially likely to change furniture when the prompt emphasizes a new action. “A woman rushes to the window” may produce a room that has a clearer window but a different chair, floor plan, and table. The action gets priority over the set’s earlier details.
Hero props and repeated objects
Some objects deserve their own continuity tracking. A red toolbox, a framed family photograph, a chipped vase, a stack of case files, or a brass key may carry story information. Their shape and position need to remain stable when they appear in multiple shots.
Text, labels, screens, and patterned objects require extra care. Models often redraw them from frame to frame. If a newspaper headline or computer display is not central to the story, keep it out of focus or replace it with a simpler surface. If it is important, generate it separately and composite it in post rather than asking the model to recreate exact lettering repeatedly.
Materials and signs of use
A location has a physical history. A wooden floor has scratches in particular places. A wall has water stains. A metal door has worn paint around the handle. A kitchen counter has crumbs, knife marks, or a dull patch near the sink. These signs give the environment a memory.
The model may preserve “weathered apartment” while changing the exact wear from shot to shot. That is not always a problem in a wide sequence, but it becomes distracting in close coverage. Choose a few visible marks as anchors and treat the rest as flexible background detail.
Light and shadow
Lighting continuity belongs to the environment as much as to the character. Track the dominant source, its direction, softness, color, and intensity. A room lit by a low sunset from camera left should not have hard morning shadows from camera right in the reverse shot unless time has passed or the geography supports it.
The visible source also matters. If a practical lamp is on, nearby objects should respond to it. If the story takes place during a power outage, bright ceiling panels should not appear in the next cut simply because the generator liked the image better.
Weather, atmosphere, and time
Rain, snow, dust, fog, wind, smoke, wet surfaces, condensation, and cloud cover all create continuity obligations. A character may remain dry while the street becomes soaked. A strong wind may blow curtains in one shot and leave them perfectly still in the next. A sunlit wall may become blue and overcast without any story reason.
Time continuity includes the position of the sun, length of shadows, color of the sky, artificial lights switching on, and the amount of daylight entering a room. You do not need to make every shot meteorologically exact, but you need a clear rule for the sequence.
Scale and spatial relationships
The room may look different because its scale changes. A doorway becomes too narrow for the actor. A table is suddenly waist high instead of hip high. A street that felt ten meters wide becomes a narrow alley in the reverse. AI systems can adjust proportions to make the current composition work.
Track relationships instead of relying only on measurements. The bed reaches halfway toward the window. The table sits two steps from the door. The character’s shoulder is level with the bottom of the framed photograph. Relative distances are often easier to preserve visually than a paragraph of dimensions.
Why AI environments drift between shots
The underlying cause is simple: most generation workflows solve each shot as a new image or short motion problem. They can borrow visual signals from a reference, but they do not automatically maintain a production designer’s understanding of the set.
The prompt describes a category instead of a location
“A cramped 1970s detective office” is a genre prompt. It can generate a hundred different offices while satisfying the words. The system knows the expected objects, colors, and mood, but not which wall contains the filing cabinet or where the door was placed in the previous shot.
A location lock needs concrete anchors. Describe the room shape, fixed openings, dominant materials, major furniture, and a few distinctive marks. “A narrow rectangular office with a frosted window on the far wall, a dark wood desk facing the door, a green metal filing cabinet beside the left wall, and a ceiling fan centered over the desk” gives the model a smaller set of possibilities.
Text to image starts over when a shot changes
If the first shot is generated from text and the second shot is also generated from text, the second prompt has to reconstruct the environment. Even a careful prompt may fail because the system is balancing the location against the actor, camera angle, lighting, action, and style.
Image references reduce this problem, but a single reference still has limits. A front-facing view cannot fully specify what lies behind the camera. A close-up may show no floor, ceiling, or wall junction. The model fills the missing parts with plausible invention.
The new camera angle exposes unseen geometry
A location can appear consistent in two frontal shots and fail as soon as the camera turns around. The generator must infer the back of the room, the opposite wall, the side of a building, or the continuation of a street. This is where doors and windows often multiply, furniture changes sides, and corridors bend in impossible directions.
The solution is to create references that cover the planned camera positions. You do not need to model every centimeter, but you should know what the camera can see from each side of the set.
Action prompts compete with set continuity
Motion is expensive in terms of visual attention. A prompt that asks for a character to sprint, knock over a chair, turn toward a flashing light, and exit through a door gives the model many reasons to redraw the environment. The system may place the action correctly by changing the room around it.
Break complicated action into short, controlled shots. Establish the location in a stable wide shot. Generate the movement from a reference with the relevant landmarks visible. If a prop is knocked over, make that change intentional and carry it into the next shot.
References are inconsistent or poorly chosen
A folder of attractive images is not the same as a location pack. One reference may show the room before set dressing, another may use a different lens, and a third may contain a different version of the building. If their relationships are unclear, the model can blend incompatible details.
Choose one master reference and label supporting images by purpose. A wide floor plan reference explains layout. A daylight image explains materials. A night image explains the lighting state. A prop close-up explains a hero object. Do not treat all images as equal evidence.
Stylization hides structural changes
Highly stylized environments can drift without looking obviously wrong in a single frame. Painterly textures, heavy fog, low light, rapid camera movement, and shallow depth of field hide details that would otherwise reveal the change. This can help a difficult shot, but it does not solve the underlying continuity problem.
Use atmosphere as a finishing tool, not as a substitute for a stable location. If fog is doing all the work of hiding mismatched architecture, the sequence will likely fall apart when the characters enter a clear close-up.
Build a location bible before generating coverage
A location bible does not need to be a large production document. For a short AI sequence, one or two pages can prevent hours of regeneration.
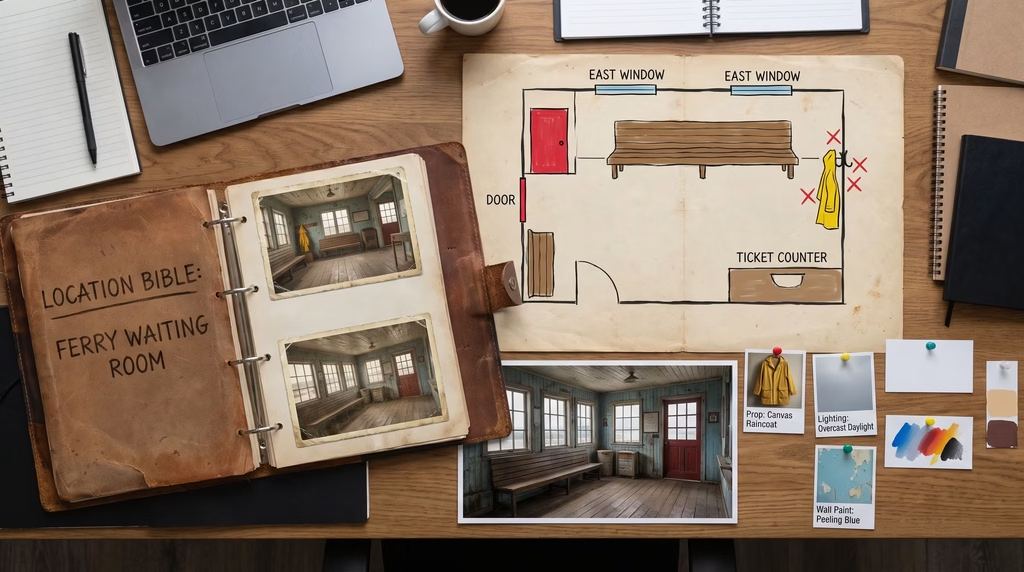
Start with a location name and a one-sentence identity lock. Use a name that is easy to repeat in filenames and prompts, such as “Mara’s basement workshop” or “North pier waiting room.” Then record the fixed geometry:
– Room or exterior shape – Camera-facing and off-camera walls – Door and window positions – Stairs, columns, alcoves, and ceiling features – Floor and wall materials – Dominant color relationships
Next, list the set dressing. Separate fixed items from movable ones. A built-in counter is fixed. A chair can move, but its movement should be recorded. Mark hero props with a short description and a default position.
Add a lighting state. Write down the dominant source, direction, color, and whether it is on or off. For an exterior, record the sun or moon direction and the weather. For an interior, note what the windows show and whether the outside light is changing.
A useful location bible might contain an entry like this:
> North pier waiting room. Small rectangular room inside a weathered wooden ferry terminal. One red door on the south wall, two tall salt-streaked windows on the east wall, built-in bench along the north wall, ticket counter in the northwest corner, blue-gray plank floor, peeling cream paint, rusted heater below the left window. Late afternoon overcast light enters from the east. A yellow raincoat hangs on the hook beside the red door. The room is damp but not flooded.
That description is plain on purpose. It gives the generator visible facts instead of broad atmosphere alone.
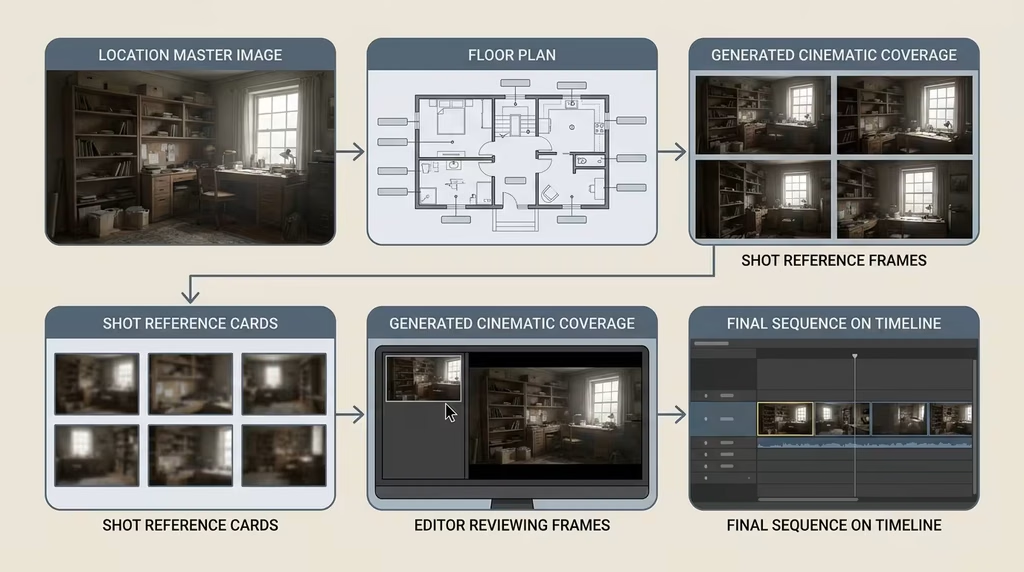
Create a master reference board
The master board should show the location clearly enough that another person could point to the major landmarks. Include a wide establishing view, a second angle if available, material details, and hero props. Keep the style, aspect ratio, and color treatment consistent across the board.
Avoid using a dramatic close-up as the only master reference. It may be beautiful, but it does not tell you where the walls meet or how the furniture is arranged. A neutral, slightly wide view is often more useful for continuity.
If your tool supports image references with weights or priorities, give the master view the highest priority. Supporting images should answer specific questions rather than introduce alternate designs.
Make a simple top-down layout
A rough floor plan can be a hand sketch. Mark the camera, subject, door, windows, furniture, and direction of travel. It does not need architectural precision. Its job is to catch impossible geography before you generate a shot.
For exteriors, use a similar overhead map. Mark the road, building entrances, trees, vehicles, walls, and the direction of the horizon. An exterior may feel open, but repeated landmarks are still needed. A character walking toward a church should not arrive at a market in the next shot unless the edit establishes the journey.
Define continuity anchors
Pick three to six details that should survive every relevant shot. Too many anchors make prompts noisy and make the production rigid. Good anchors are easy to see and spatially useful: a round window, a red door, a dark beam, a blue rug, a crooked sign, or a distinctive lamp.
Do not make every stain an anchor. Background variation can be harmless and may help the sequence feel alive. The goal is to protect the details that tell the audience they are still in the same place.
A practical generation workflow
The order in which you generate matters. Start with the environment, then add people and action. This gives the location a chance to stabilize before motion and performance introduce more uncertainty.
1. Generate the establishing shot
Create a wide shot that shows the main geometry and the dominant continuity anchors. Keep the camera movement minimal at first. A static or very slow push gives you a reliable reference for later coverage.
Review the image as a production designer would. Count the windows. Find the door. Trace the route from the subject to the important prop. Check whether the floor and ceiling agree with the intended scale. If the first environment is wrong, do not build the rest of the sequence on it because it looks attractive.
2. Lock the environment before adding complexity
Use the strongest version of the establishing shot as the master. If possible, create variations from that image rather than returning to text only. Generate an alternate angle while preserving the master reference and the floor plan.
At this stage, do not ask for a dramatic performance. The test is whether the room survives a camera change. If it cannot, more action will make the problem harder to diagnose.
3. Generate coverage from the layout
Plan a small set of shots: establishing wide, medium, close-up, reverse, insert, and exit or transition. For each one, record camera position, lens feel, subject position, visible anchors, and expected light direction.
A shot card can be short:
> Shot 04, medium over the bench toward east windows. Camera near the south wall, looking north. Red door remains behind camera. Yellow raincoat visible at frame left only if the angle permits. Overcast east light on the character’s right cheek. Bench stays along the north wall.
The card keeps the prompt tied to a physical setup. It also gives an editor a reference when comparing generations.
4. Add movement in small pieces
Once the environment matches, add one major action at a time. A character crosses the room. A door opens. A lamp flickers. A gust moves the curtain. If you ask for all of these in a single generation, you may not know which instruction caused the set to change.
For image to video, use a strong first frame with the location landmarks visible. Keep the duration short when the model is prone to drift. A three second shot that cuts cleanly may be more useful than a ten second shot whose walls deform in the final half.
5. Track intentional changes
Continuity does not mean nothing can change. A door can open, a glass can break, a chair can fall, and daylight can fade. The important distinction is whether the change has a cause in the story.
Record state changes in the shot notes. If the lamp is knocked over in Shot 07, mark it as off and on the floor for Shot 08. If rain begins, mark wet surfaces and costume state. This prevents the generator from treating a continuity error as a new creative choice.
Prompting environments for continuity
A continuity prompt works best when it separates stable facts from the new shot’s variables. Put the location identity first, then the camera and action. Do not bury the room description inside a paragraph of mood words.
A useful structure is:
> Same North pier waiting room as the master reference. Preserve the rectangular room, red door on the south wall, two salt-streaked windows on the east wall, built-in bench along the north wall, ticket counter in the northwest corner, blue-gray plank floor, peeling cream paint, and rusted heater under the left window. Medium shot from near the south wall looking north. The woman sits on the bench and turns toward the windows. Late afternoon overcast light enters from the east. Keep the room layout, object positions, materials, weather, and scale unchanged.
The first sentence tells the system that the reference is the authority. The next sentence repeats only the anchors that matter. The camera and action then create the new image without replacing the set.
Use visible relationships
“A chair in the room” is weak. “A wooden chair is tucked under the ticket counter in the northwest corner” is stronger. “A lamp on the table” is weaker than “a green desk lamp sits on the right side of the desk, its shade facing the door.”
Relationships survive changes in framing better than isolated labels. Mention what is beside, behind, beneath, or aligned with the anchor. If a prop’s exact position can change intentionally, say so.
Separate locked and flexible details
A prompt can state that the architecture, major furniture, and hero props are locked while background clutter remains flexible. This gives the model a hierarchy and prevents it from spending equal effort on every object.
For example:
> Lock the wall openings, floor plan, bench, ticket counter, red door, and yellow raincoat. Keep minor papers and distant surface scratches flexible. Do not add new furniture or windows.
Negative prompts can help, but they are not magic. “No extra windows” may reduce a common error, while a long list of every possible unwanted object can dilute the positive instructions. Protect the main facts first.
Avoid conflicting style language
Words such as “minimalist,” “cluttered,” “pristine,” and “decayed” can pull the environment in different directions. A location can be tidy but old, or cluttered but carefully organized. Use observable details instead of stacking contradictory moods.
The same applies to lens and perspective. If one prompt asks for a wide-angle room and another asks for compressed telephoto depth, the apparent spacing may change even if the furniture stays in place. Keep the camera language coherent across a coverage group.
Fixing common environment failures
The room changes shape
First compare the camera angle. A different focal length or camera height can make a room feel larger or narrower. If the actual geometry changed, return to the master reference and simplify the shot. Show at least one fixed landmark near the edge of the frame. A doorway or wall junction gives the model something concrete to preserve.
You can also use a layout-aware workflow, a rough 3D blockout, or compositing guides to establish the camera. Even a crude blockout with planes and boxes can provide better spatial control than a text prompt alone.
Doors and windows multiply or disappear
Count openings in the establishing shot and repeat the count in the shot prompt. State their wall positions. If a window is outside the current frame, do not mention it as if it must be visible, but keep it in the location bible so the next angle can recover it.
When a generated image adds an attractive but incorrect window, remove it before using the image as a reference. Otherwise the error becomes part of the new master.
Furniture moves between cuts
Use a wide reference with the furniture clearly separated. For close shots, include a visible edge of the relevant item or its nearby landmark. Generate the close-up from the matching wide frame when your tool supports it.
If only the close-up matters and the background is soft, consider replacing the unstable furniture with a controlled plate or masking it. Do not spend hours forcing a low importance background chair to match pixel for pixel if the audience will never notice it after the cut.
Props change design
Create a dedicated prop reference with front, side, and detail views. Keep the description concrete. “Old brass key with a round bow, three teeth, and a blue thread tied through the hole” is more useful than “mysterious vintage key.”
For critical props, generate an insert separately. Compositing a stable prop over a broader shot can produce cleaner continuity than asking the model to render the prop in every angle. Make sure the inserted object receives matching light and motion blur.
Light direction changes
Write the light direction as a room rule, not just a shot effect. “Overcast daylight enters from the east windows and creates soft illumination on the west-facing surfaces” is useful across coverage. If a practical is the dominant source, say whether it remains fixed in the set.
Check shadows on the floor and walls. The face may appear consistent while the environment reveals the error. When necessary, generate a lighting pass or grade the shot to bring the values and color closer together. Color correction can smooth differences, but it cannot fix a shadow that points through a wall.
Weather resets between shots
Record the weather state in simple terms. Dry pavement, light rain, heavy rain, fresh snow, wind from camera left, or fog hiding the background are clear states. Avoid relying on a general phrase such as “moody storm atmosphere.”
Match surface response. Wet pavement should reflect practical lights differently from dry pavement. Snow should remain on ledges until it melts or is disturbed. A wet coat should not become dry during a continuous exchange. These details may require separate image to image corrections or a compositing pass.
The environment changes style
A sequence can drift from realistic photography to glossy concept art when prompts use inconsistent style references. Choose a visual target and keep the camera, contrast, texture, and color language stable. If you need a stylized transition, make it a deliberate editorial event with a clear beginning and end.
Reference images should also share a similar treatment. A warm film emulation on one master and a crisp digital look on another can make the same wall appear to be made from different material.
Scale becomes impossible
Place the character beside fixed objects whose size is understood, such as a standard door, chair, countertop, or vehicle. Keep camera height and perspective coherent. When a shot requires a low or high angle, say so, but preserve the object’s relationship to the ground.
If the actor appears to shrink while walking, the issue may be temporal as well as spatial. Shorten the motion, stabilize the first and last frames, and check whether the background is deforming to accommodate the stride.
Reflections and windows reveal contradictions
Reflective surfaces can expose an inconsistent environment because they show a second version of the room. A mirror may contain an extra doorway. A window reflection may show the sun from the wrong side. A polished floor may duplicate furniture that no longer exists.
Keep reflections controlled when they are not important. Use matte or lightly textured surfaces for difficult shots, or generate reflection plates separately. If a mirror is central to the story, treat its content as a separate continuity problem and give it its own reference.
When to use compositing and post-production
Not every environment problem should be solved by regenerating the whole shot. A replacement background, tracked matte, set extension, or clean plate can preserve good performance while fixing the location.
Compositing works well for static or slow-moving areas. Replace a wall, window view, sign, table surface, or background prop while keeping the actor and foreground intact. Match perspective, grain, depth of field, motion blur, and light spill so the repair belongs to the shot.
A clean plate is useful when the actor moves away from an object and the object needs to be changed. Generate or photograph the empty environment, then combine it with the performance. If the camera moves, track the plate to the shot. A rough 3D camera solve can help even when the original material is AI generated.
Use post production for local repairs, not for a fundamentally wrong layout. If the door is on the wrong wall and the scene depends on the character exiting through it, repainting the door may be slower and less convincing than regenerating the shot from the correct reference.
Color grading can align exposure, white balance, contrast, and saturation. It cannot make a sunny exterior become physically identical to a stormy one if the surfaces, shadows, and actor’s wetness disagree. Grade after the structural fixes, not before.
An editing check for environment continuity
Review the sequence with the sound muted first. Dialogue and music can distract from visual geography. Watch the cuts at normal speed, then step through the problem transitions frame by frame.
Ask these questions:
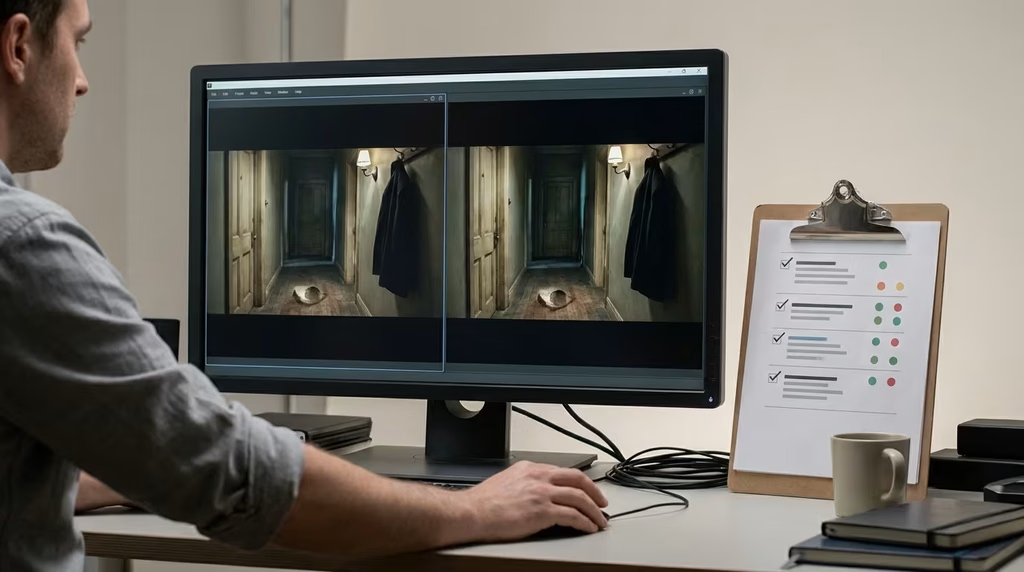
1. Can I draw the room or exterior layout from the shots I have seen? 2. Do doors, windows, stairs, and major wall features stay in their expected places? 3. Are repeated props the same design and in a plausible position? 4. Does the dominant light come from the same direction? 5. Do weather and surface conditions match the elapsed story time? 6. Does the character move through a space that has the same scale? 7. Are reflections, shadows, and background views consistent with the camera position? 8. Did any object change because the story caused it, or because the model improvised?
Freeze frames from adjoining shots and place them side by side. A continuity board is often more revealing than watching the sequence repeatedly. Mark the first frame where the environment changes. The earliest error is usually the best place to repair because later shots may already depend on it.
Keep a rejection log. Note the failure, likely cause, and next change. “Extra window in reverse angle, reference did not show east wall” is more actionable than “room feels off.” The log also prevents you from repeating the same generation with slightly different wording.
A repeatable checklist before final export
Before approving a location sequence, create a short continuity sheet for every environment. Include the location name, master reference filename, fixed landmarks, hero props, camera direction, lighting state, weather, and intentional changes. Keep the sheet next to the generation prompts rather than in a separate archive that nobody opens.
Check the first and last shot of the sequence together. If the story returns to the location later, compare the return shot with the original establishing image. Time may have passed, but the changes should have a cause. A room can become darker, messier, or damaged. It should not become a different room by accident.
Check transition points at the moment of the cut. A continuity error hidden in a standalone frame becomes obvious when the viewer’s mental map is forced to jump. Pay special attention to reverse angles, entrances and exits, inserts of hero props, and shots generated after a major camera move.
Check the background behind faces. AI artists often inspect the actor first and miss a wall opening, lamp, or piece of furniture that has shifted behind the head. The background still carries spatial information, especially in dialogue scenes.
Check the edges of the frame. Continuity anchors placed near an edge may be cropped, stretched, or replaced. Keep important landmarks well inside the frame when you need them as references, then let them leave the frame only after the location has been established securely.
Check motion over time. A stable first frame does not guarantee a stable environment. Watch for wall breathing, furniture morphing, repeated textures sliding, window frames bending, and shadows pulsing. If the location drifts in the middle of a shot, trim the shot, reduce motion, or use a controlled plate.
A compact example: repairing a diner scene
Imagine a two minute scene set in a roadside diner at night. The scene includes a waitress, a tired driver, a red coffee pot, a neon sign outside, and a booth by the front window. The first generated images look good, but the sequence has several problems. The booth changes from blue vinyl to brown leather. The neon sign moves from the left window to the right. The coffee pot becomes a metal kettle. Rain appears on the glass in the wide shot and disappears in the close-up.
The repair starts by choosing one wide frame as the master. The location lock records a rectangular diner, red door at the rear, counter along the west wall, blue vinyl booth beneath the east window, red coffee pot on the counter, and a pink neon sign visible through the east window. Rain is falling outside, and a warm ceiling practical mixes with pink light from the sign.
A simple floor plan fixes the camera geography. The wide shot looks east from near the counter. The driver’s close-up looks west toward the counter. The waitress reverse stays near the booth and keeps the east window behind her. The coffee pot remains on the counter unless the waitress picks it up.
The close-ups are generated from the master frame and a crop that retains the relevant background edge. The prompt locks the blue booth, east window, pink sign, and warm interior light. Minor background clutter is allowed to vary, but the hero elements are protected.
The coffee pot insert is generated separately from a prop reference. It is composited into the counter shot with a small reflection and a warm highlight. The neon sign is kept soft and partly obscured by rain, which reduces the need for exact letter reconstruction. The editor trims a drifting section from the waitress shot and uses a shorter take with more stable window geometry.
The result does not require every coffee cup or crumb to match. The audience needs the diner to have a stable identity and the story props to behave consistently. Control the parts that carry geography and meaning. Let the rest remain naturally imperfect.
The deeper production principle
Environment consistency is a design problem before it is a prompting problem. A generator cannot preserve a location that the filmmaker has not defined. It cannot reliably infer which details are fixed, which can move, and which changes have a story cause.
The strongest workflow treats each location as a reusable asset. Give it a name, a master view, a layout, a lighting state, a prop list, and a small set of anchors. Generate from that asset in shot-sized steps. Review the set independently from the performance. Repair local errors in post and regenerate structural errors from a better reference.
This approach may feel slower at the beginning. In practice, it is faster than generating a full sequence from loosely related prompts and discovering at the edit that every reverse angle belongs to a different building. A few minutes spent on a floor plan can save an afternoon of trying to persuade a model that the door has always been on the other wall.
AI filmmaking becomes easier to control when you stop asking the model to remember a vague place and start giving it a place with rules. Stable environments do not come from a magic phrase. They come from references, hierarchy, shot planning, and the willingness to reject a beautiful frame that breaks the world of the film.
Continue reading
Further insights from the Journal


Have a story in mind?
Bring your next project into focus.
Tell us what you are creating and what you want the audience to feel.